Working with iOS Devices Post-11.4.1
by Chris Vance, MCFE, Magnet Forensics Manager, Training Curriculum Development
With iOS 11, Apple decided to focus heavily on the end user’s security and privacy by releasing incremental updates that added several additional features. The initial release of iOS included:
- New security features, such as requiring the passcode to create a trust-pair relationship (changes from just having the device unlocked).
- Moving two-factor authentication PIN codes behind the lock screen.
- The same backup encryption strategy of iOS 10.2.
Because of these security enhancements, it has become imperative that the examiner obtain the user’s handset lock code. Individuals may not always be receptive to this or the user may not be able to give this information.
A Primer: USB Restricted Mode
Another incremental change which the forensic community has been tracking for some time is the release of “USB Restricted Mode.” This mode, when enabled, will cause the lightning port on the iOS device to disable after a period of time, allowing only power to pass through the port. More specifically, the pins on the port responsible for passing data are disabled and won’t allow any USB device or computer to connect to the iOS device.
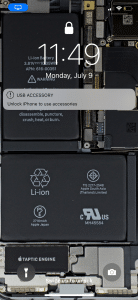
With the release of iOS 11.4.1, Apple finally made USB Restricted Mode—previously available only in beta versions—publicly available. The timing window was set for one hour, meaning that after 60 minutes of being locked, the device cannot be connected to a forensic computer. This addition now drastically changes the way we as examiners must deal with iOS devices in the field during seizure and acquisition.
The actual setting which controls USB Restricted Mode can be found under the Settings à Touch ID & Passcode / Face ID & Passcode menu. Regardless of what biometric unlock your iOS device is using, to see these settings, the actual passcode must still be entered here. That way, examiners can disable the mode if they happen to catch an unlocked device in the wild. The toggle switch which controls this mode is called “USB Accessories” and can be confusing for those that are seeing it for the first time.
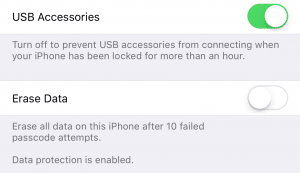
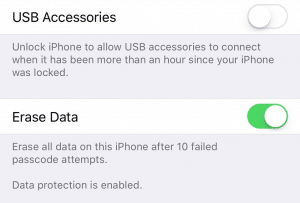
When USB Restricted Mode is enabled, any USB accessory or forensic computer that is attached to the device will generate a notification on the device saying “Unlock iPhone/iPad to use accessories.” This is accompanied by three long vibrations.When the toggle is ON, USB Restricted Mode is actually disabled. When the toggle is set OFF, USB Restricted Mode is enabled and the one-hour window is in effect. This is the default setting.
It is also possible to manually trigger this mode by sending the device to SOS or emergency mode. This feature, added in iOS 11, can be activated normally using SOS mode by holding the volume and power buttons together or rapidly pressing the power/side button 5 times.
The one-hour time limit drastically changes the way first responders handle iOS devices. Because this will most likely be the setting going forward, and it’s hard to figure out what version the device is running just from looking at it quickly, examiners and first responders need to treat every iOS device going forward as if we only have a one-hour limit to connect it.
If the examiner has the handset lock code, the one-hour limit is less of a factor because the mode is reset as soon as the device is unlocked. However, if the handset lock code is not known or available, this is where we must act quickly.
A tool such as Grayshift’s GrayKey has been known to allow us to attempt a brute-force of the handset lock code of modern iOS devices. However, we must be able to connect the device to the unit while it is not in USB Restricted Mode. This gives us only a finite window in which to achieve this connection for extraction.
Delaying the Timer
The 1-hour timer seems to start from the moment the device is locked. As soon as the device is unlocked, either with the handset lock code or the biometrics for that device, the timer is reset until the device is locked again, and then the process repeats.
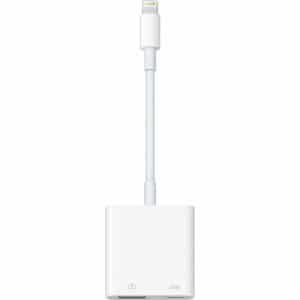
A small loophole allows users to delay this timer from enabling. Connecting a USB accessory device such as the “Apple Lightning to USB 3 Camera Adapter” within the 1-hour limit delays that timer for 7 days. If the adapter is removed and reconnected, the iOS device will then restart the 7-day timer. This process is repeatable.
Not all adapters are made equal. Some adapters that we have tested worked great, while others gave us false hope. It seems that devices that can maintain a USB connection, such as OTG devices or display adapters, have a higher chance of working. Even still, no adapters have been able to disable USB Restricted Mode completely once it’s been activated.
Some of the devices that worked:
- Apple Lightning to USB 3 Camera Adapters
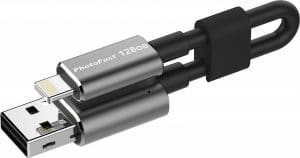
- PhotoFast 32GB OTG USB Lightning Drive
- An untrusted computer (does not matter if iTunes is installed)
Some of the ones that did NOT work:
- Apple Lightning to AUX (3.5mm) Adapter
- Apple Lightning to MicroUSB Adapter
It’s important to test any device before going into the field with it. We recommend that you lock the device, plug in the desired accessory, then wait approximately 65+ minutes. Remove the adapter, then try to connect to a forensic computer.
If the PC recognizes the iOS device and allows you to check for the UDID, it worked! The timer was delayed, and you were able to gain connection to the device. If the device vibrates 3 times and displays the previously mentioned notification, unfortunately that device did not delay the timer.
It’s important to note that power may also need to be applied while the adapter is delaying the timer. Adapters that feature a lightning port can provide power to the device by also connecting to a portable battery pack. OTG Lightning/USB Drives and the Camera/Display adapters take top marks for this because of their dual purpose.
In-Field Best Practices WorkflowRecent testing has also shown that even an untrusted computer can act as a delay device. Plugging the target’s device into a PC could delay the timer from enabling and provide charge to the device. Because it would be difficult to isolate the device like this, however, it is important to use proper Faraday bags with shielded cabling, or ensure the device is in Airplane Mode.
For any examiner or first responder in the field, a new set of protocols must be developed around dealing with iOS devices. Once an iOS device has been identified as being of interest, it must immediately be connected to a source to delay the USB Restricted mode timer and acquired as soon as possible. Even if the data is not going to be analyzed for months, acquiring it immediately ensures that the examiner will at least be able to collect the information.
To that end, we recommend the following best practices workflow for iOS devices:
- Identify that the iOS device is needed for evidence.
- Immediately plug in an adapter to delay USB Restricted Mode.
- Attempt to access the iOS device’s Control Center and enable Airplane Mode.
- Connect the device to power/charge for transportation.
- Place the device and charger battery into a Faraday bag.
- Immediately image the device using a forensic tool such as Magnet AXIOM or ACQUIRE.
- If the device handset is locked, keep the device powered and isolated.
- Continue to leave the adapter inserted, unplugging and re-plugging every 7 days until passcode can be obtained.
Even if the first responder connects the device and sees the “Unlock iPhone to use accessories” prompt, it’s important to educate them to make sure they still transport the device to a forensic laboratory for imaging immediately. The biometric unlocks may still be available if all three of the following conditions are met:
- The device has been unlocked in the last 48 hours.
- The SIM card slot hasn’t been removed.
- The device hasn’t been rebooted.
Under these conditions, law enforcement may be able to compel the user to give their fingerprint or facial unlock to re-enable the USB port.
If the device is now unavailable for imaging, thanks to USB Restricted Mode or handset lock codes, the examiner will have to turn to iCloud backups or locally stored iTunes backups. With information that can be gathered by looking at the device, it may be possible to send a search warrant to Apple to obtain the backups from iCloud and other data such as iCloud iMessages and Photos.
If the iCloud passcode can be obtained, with proper authority, the examiner can also use AXIOM Cloud collection features to pull this information into AXIOM alongside other relevant information.
In conclusion, it is important for every agency to invest in some adapters that can help delay this timer and educate first responders and analysts alike. Resources like the Magnet Forensics iOS 11 white paper can be distributed for information and is available for free on the Magnet Forensics website.
We as a community must change the way we handle and look at iOS devices, acting immediately to ensure we can collect information from them as this feature becomes more widely spread.